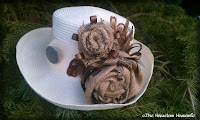
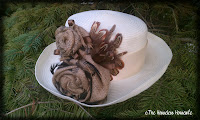
 Hopefully, after reading Part 1 you have developed a vision for your hat creation. You may or may not have a clear and detailed plan; which is perfectly fine also. Minimally, you should have selected your colors, and any number of embellishments that when placed together, they make sense and harmonize. What I mean by this is: if you envisioned an equestrian theme in black, red and gold, adding a jungle animal print or butterfly fairies wouldn't "make sense". It is quite alright to experiment with these embellishments as you go, and as you will see by the end of this post, my vision had changed slightly in my creative process!
I had a simple creme hat base to start with, and I knew I wanted to develop it for use on the casual side. I envision the hat to be used during the day; perhaps for a future Leadline pony class with my Daughter. I had picked up a few old burlap coffee bean bags, and I knew that the natural colors, and rustic material would achieve the look I was going for.
Additionally, I liked the simple burlap to be the focal point of the piece, and opted to create fabric roses from the material. Continuing with the simplicity, the complimenting colors I chose for the creme hat base were: coffee brown, black with grey as the accent color.
To create your own fabric roses, follow these steps:
1. Cut long strips of material, one for each rose. If you would like your roses to be of varying sizes, either cut wider strips, or longer lengths (or both!) for each. I recommend keeping the width no less than 2 inches.
2. Tie off one end with a simple knot. This will be the center.
3. Hold the small "tail" end of the knot between your fingers and with your other hand, grasp the start of your remaining material, keeping the material naturally folded in half lengthwise. Now, start to wrap the material around the knot, twisting the material clockwise every half turn or so. Every few laps, add a drop of glue between the layers with a hot glue gun to keep the "petals" straight.
4. When you reach the end, turn the remaining piece to cover the flat bottom of your rose, add some more glue and trim off the excess.
Here I made three to use.
Design tip:
If using a similar object in repetition,
odd numbers are more visually appealing.

Moving on, I knew I wanted to trim around the hat in a simple creme ribbon, and fortunately had some leftover ribbon that matched perfectly. I recommend tacking the ribbon down with a few simple running stitches. Using a hot glue gun stains the ribbon and leaves unsightly ripples.
Make sure you tack a stitch in the back of the hat...hidden on the bottom works best to keep the ribbon from shifting.
If you keep your extra buttons that accompany a new shirt, like I do, then you have a great resource for details! A large grey sweater button that fittingly belonged to an old maternity sweater, was chosen for the accent color.
To create a faux button tab, follow these steps:
2. Finding the center, fold one half back, starch and iron. Repeat for the other side.
3. Flip the ribbon over, which is now the front side and iron again.
4. If your button has a hidden eye, then place the button bottom on the ribbon where you would like it to sit, flip the ribbon and make a small hole with a scissors. Press the eye through the hole so that the front of the button lays flat along the ribbon. Sew the button in place, incorporating the folded tabs with a tack stitch along the way. After you have your button sewn in place, tack stitch or glue the faux button tab in place onto your hat band.
 From this point on, I experimented with the placement of my fabric roses. Eventually, I went against my original vision of using three roses in a cascading fashion, and liked the look of two; the smallest over the largest. Using just a hot glue gun, I firmly glued the roses to the hat.
 This is now the point where your creativity kicks in. Using individual feathers, I added small black plumes around the outer petals of the larger rose, to emphasise the black burlap lettering. For the smaller, daintier rose, I snipped (5) 1 inch pieces of brown ribbon, folded them in half, glued the ends together, and then glued them into place around the outer petals. To fill in the void space where the roses meet the hat, I individually glued small brown feathers in an offset radiating pattern to create a back round of visual interest. Finally, I made three more larger 3 inch loops of brown ribbon, and glued them where the larger rose meets the smaller rose; tucking the glued end in firmly.
Once you are happy with your completed project, try it on! Don't be surprised when a complete stranger comes up to you on the day of your event to ask, "Where did you get that beautiful hat!"
Cheers!


No comments:
Post a Comment