html xmlns:fb="http://ogp.me/ns/fb#"> The Horseless Housewife: April 2013

Sunday, April 28, 2013

DIY Kentucky Derby / Special Event Hat (Part 2)

Hopefully, after reading Part 1 you have developed a vision for your hat creation. You may or may not have a clear and detailed plan; which is perfectly fine also. Minimally, you should have selected your colors, and any number of embellishments that when placed together, they make sense and harmonize. What I mean by this is: if you envisioned an equestrian theme in black, red and gold, adding a jungle animal print or butterfly fairies wouldn't "make sense". It is quite alright to experiment with these embellishments as you go, and as you will see by the end of this post, my vision had changed slightly in my creative process!

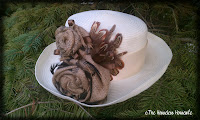
I had a simple creme hat base to start with, and I knew I wanted to develop it for use on the casual side. I envision the hat to be used during the day; perhaps for a future Leadline pony class with my Daughter. I had picked up a few old burlap coffee bean bags, and I knew that the natural colors, and rustic material would achieve the look I was going for.

Additionally, I liked the simple burlap to be the focal point of the piece, and opted to create fabric roses from the material. Continuing with the simplicity, the complimenting colors I chose for the creme hat base were: coffee brown, black with grey as the accent color.


To create your own fabric roses, follow these steps:

1. Cut long strips of material, one for each rose. If you would like your roses to be of varying sizes, either cut wider strips, or longer lengths (or both!) for each. I recommend keeping the width no less than 2 inches.

2. Tie off one end with a simple knot. This will be the center.

3. Hold the small "tail" end of the knot between your fingers and with your other hand, grasp the start of your remaining material, keeping the material naturally folded in half lengthwise. Now, start to wrap the material around the knot, twisting the material clockwise every half turn or so. Every few laps, add a drop of glue between the layers with a hot glue gun to keep the "petals" straight.

4. When you reach the end, turn the remaining piece to cover the flat bottom of your rose, add some more glue and trim off the excess.
fabric roses


Here I made three to use.
fabric roses

Design tip:
If using a similar object in repetition, 
odd numbers are more visually appealing.
hat band

Moving on, I knew I wanted to trim around the hat in a simple creme ribbon, and fortunately had some leftover ribbon that matched perfectly. I recommend tacking the ribbon down with a few simple running stitches. Using a hot glue gun stains the ribbon and leaves unsightly ripples. 

Make sure you tack a stitch in the back of the hat...hidden on the bottom works best to keep the ribbon from shifting.

If you keep your extra buttons that accompany a new shirt, like I do, then you have a great resource for details! A large grey sweater button that fittingly belonged to an old maternity sweater, was chosen for the accent color.

To create a faux button tab, follow these steps:
faux button tab
1. Using about 6 inches of ribbon, starch and iron the frayed end back.


2. Finding the center, fold one half back, starch and iron. Repeat for the other side.


3. Flip the ribbon over, which is now the front side and iron again.


4. If your button has a hidden eye, then place the button bottom on the ribbon where you would like it to sit, flip the ribbon and make a small hole with a scissors. Press the eye through the hole so that the front of the button lays flat along the ribbon. Sew the button in place, incorporating the folded tabs with a tack stitch along the way. After you have your button sewn in place, tack stitch or glue the faux button tab in place onto your hat band.


From this point on, I experimented with the placement of my fabric roses. Eventually, I went against my original vision of using three roses in a cascading fashion, and liked the look of two; the smallest over the largest. Using just a hot glue gun, I firmly glued the roses to the hat.
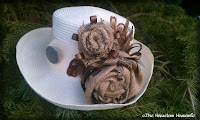
diy kentucky derby hatThis is now the point where your creativity kicks in. Using individual feathers, I added small black plumes around the outer petals of the larger rose, to emphasise the black burlap lettering. For the smaller, daintier rose, I snipped (5) 1 inch pieces of brown ribbon, folded them in half, glued the ends together, and then glued them into place around the outer petals. To fill in the void space where the roses meet the hat, I individually glued small brown feathers in an offset radiating pattern to create a back round of visual interest. Finally, I made three more larger 3 inch loops of brown ribbon, and glued them where the larger rose meets the smaller rose; tucking the glued end in firmly.

diy kentucky derby hat
Once you are happy with your completed project, try it on! Don't be surprised when a complete stranger comes up to you on the day of your event to ask, "Where did you get that beautiful hat!"

Cheers!

Saturday, April 20, 2013

DIY Kentucky Derby / Special Event Hat (Part 1)

Derby HatIf you follow Thoroughbred racing, or not, it seems that when the first Saturday in May approaches, everyone gets into the Derby. And by "Derby", I mean the Kentucky Derby; the Grand Dame of the them all...well, at least here in the States. And, if you are lucky enough to hold a ticket to the fanciest pomp and parade that Churchill Downs has to offer, then my Dear, you need a hat!
Derby hat    In this two part series, I will first show you how to become inspired and develop your ideas for your hat creation. In the second installment, I will assemble a hat, and show you some simple and easy embellishments.
Derby Hat
Although, I have attended my share of Arlington Million and Illinois Derby races, both in which women adorn themselves with beautiful and elaborate Derby-style hats; I had always made my own hat to fit my dress for the day. Your inspiration should start with what style of hat best suits your face, the weather, and the formality of the occasion.  Then, decide on your color combinations; pulling colors, tones and textures from your dress or outfit you chose to wear. Lastly, think about whether you would like to make a bold statement piece, or keep it simple and classic.

Derby HatNow, I believe finding the perfect base hat will be the hardest decision you will have to make in this process! The hat is the foundation, and ultimately has to be comfortable and frame your face well. You can grab a honest friend (or perhaps your Mother, right?) and try on varying styles of finer Department store hats. You may buy one there, or just try on a variety of styles to get an idea of suits you. Another option that I prefer, is to shop online at a Millinery supply store. Millinery's are persons who build and design hats from scratch, real artisans, as well as a time-honored profession. Keep in mind, your choice should be stable and stiff enough to support your embellishments, but "breathable" if you need the hat during hotter weather. 
Derby HatDerby Hat
                                                                                                        Some creative elements can be taken from your chosen accessories. Look at the natural textures or patterns of your jewelry, shoes or belts...is there a theme? Would you rather compliment these items with a similarly colored solid or tonal designed ribbon? Or on the contrary, would you like to call attention to say a particular piece of jewelry, by emphasizing or repeating the pattern in your hat? I love a little bit of "movement" in order to draw attention up to my face, and almost always add feathery plumes in my creation to achieve this. Again, Millinery supply stores offer a variety of add-on embellishments, but your local craft store can be just as productive with faux flowers, birds and feathers, butterflies, beading, buttons, netting, ribbon, leather...anything can be decorative if you have a theme! Additionally, I usually stick to three to four colors in my theme, total. I chose one of these colors as an accent straight away. The remaining colors can include the shade of the hat, or body, and the other colors are complimentary. If you are unsure if your colors will "go together" an easy way is to squint and visualize the color as a shade of grey. Dark, medium or light tones of grey will naturally complement similar dark, medium or light tones of grey. 

Lastly, I like to add a touch of personality: something that only I may know its meaning, or people who know me contribute it to my style. If I am creating a hat for an Equestrian event, there will always be a nod to that fact. It may be a pony bit, a piece of braided rein, stable colors or horse tail hair braided as decoration. Otherwise, I would add a subtle monogram, or use vintage buttons or costume jewelry. Either way, it helps to have your ideas narrowed down before you accomplish your shopping trip. That way, you won't end up frustrated and empty handed! 

Coming in Part 2: Creating fabric roses, simple stiching and gluing, and creating a focal  point.

Cheers!
Derby Hat


Wednesday, April 10, 2013

The Bee Hive: Take a Look at what's Inside!

After much anticipation, my first bee hive arrived at my front door this week! After popping open the series of cardboard boxes, I quickly assemble the components to show you what's inside...


bee hiveI ordered my hive already assembled and painted from Mann Lake (a beekeeping supply company) and was very pleased with the construction and quality. You have two options in size with bee hives; 8 frame and 10 frame, which denotes how many frames the box holds. After attending beekeeping classes, and hearing the argument for the benefits of either, I personally choose the larger 10 frame.


bee hiveFrom the bottom up, Bee hives are completely based on stacking each component. This way, a beekeeper can remove parts of the hive to tend to the bees and honey. When full, a bee hive of this size can weigh up to 200 pounds. The bottom most component, in which the entirety of the hive rests on, is aptly named the "bottom board". Bottom boards serve as the floor, and entrance into the hive, and can be solid or screened. Screened boards are more widely used for the improved ventilation into the hive, and the ability for unwanted pests and debris to fall out through the bottom.
 
bee hive
bee hiveThe amount of bees coming in and out of the hive during the Fall, Winter and early Spring can be controlled with a entrance reducer. This device also helps to defend the hive against intruders when the bees are clustering in colder weather, and unable to monitor the entrance effectively.
                                                                                                                             
bee hiveWorking our way up, we have the body of the hive. The amount of boxes, or Supers can vary depending on the production of your hive. Normally, the bottom two deeper boxes are reserved for Brood boxes. This is where the Queen bee lives with her workers, and spends her days laying eggs to replenish her work force. The boxes above the Brood boxes are shallower and are ideally used for honey production.


bee hive
Inside each of these boxes, the Beekeeper provides the bees with frames to make honeycomb on. There are various types of frames for this, which I won't go into, but I choose plastic frames for my bees. These frames have a raised  honeycomb pattern imprinted on the plastic sheeting, and are coated with a thin layer of bees wax to help my bees get started on making comb.

bee hive, super

The spacing between the frames are sized to allow the bees to work throughout the hive, depending on their job. If you remove a few frames, you can peer down into the hive...at least while it's still empty!


beehive, inner coverThe roof of the hive consists of two parts. The flat, metal covered outer cover shown above, and the inner cover. The inner cover serves several purposes: it tops the uppermost Super as a ceiling, and has an oblong hole cut into the center to allow the Beekeeper to feed the bees during Winter. This cut-out also allows for ventilation to reduce condensation, and allows a secondary bee escape.


In a few more weeks, the Italian honey bees I ordered will find themselves in their new home on our Farm. Hopefully by then, the weather turns a bit warmer so I can have a honey harvest, and of course I can blog about it!

Cheers!

Wednesday, April 3, 2013

Soil Amendment: Using Wood Ash in Your Garden

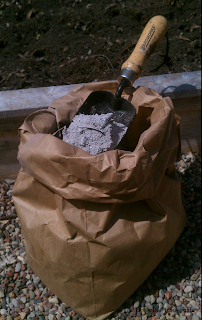
We are elbows deep into a full-blown Spring cleaning at my house, literally! With tools and a paper bag in each one of my rubber-gloved hands, I stare into the very sooty mess of a well-used fireplace. I only hope that we are done with this unseasonably cold weather, so that I may finally close the damper, and harvest the remaining hardwood ash for the garden beds. The benefits of wood ash to plants, and its contributions in the replenishment of the soil, are nothing new to the well-tuned Gardener.  If you think about it, even Mother Nature replenishes itself with more vigor after a forest fire, right?

Why Add Wood Ash?
wood ashWhen amending your garden soil in the Spring, the purpose is to replenish nutrients lost during last year’s growing season, and over the winter. Besides using organic matter like compost and manures, have you considered using burned wood ash? Wood ash is beneficial for increasing soil ph. Depending on the hardness of the wood used; its ash will fall between 9 and 13 on the ph scale. For all us who have been out of school for a while, this places it on the alkalinic side, giving it properties similar to using a 0-1-3 fertilizer. Wood ash also contains a minimal reserve of phosphorous and potassium, but is also void of nitrogen; which also makes it comparable to adding lime to your garden.  A simple soil test can determine if your soil is acidic, and in need of the benefits from wood ash. As a rule of thumb, areas with high concentrations of rain (about 20 inches per year) tend to have acidic soil. On the contrary, if your soil is already at a 7.5 ph or greater, wood ash would not be beneficial.
 
How and Where to Apply
In either the early Spring or Fall, apply up to 20 pounds per 100 square feet, working it well into the soil to a depth of 6 inches in areas where you will be locating plants with acidic tendencies. You can lightly sprinkle the ash around your established plants, but avoid new seedlings and sowed seeds as the concentration of salt is harmful to young plants. Keep in mind, if working it into your soil; allow 2 weeks to pass before setting seeds or transplants.
A few examples of plants that benefit from wood ash:
Exceptional health and growth of tomatoes, cabbage, asparagus, peas and beans especially. Likewise, root vegetables such as carrots and parsnips also benefit by the ash’s ability to repel carrot flies and root maggots. Lightly apply to any garden flowers and yard beds containing sunflowers, carnations, daffodils, asters, poppy, clematis, spirea, boxwoods and yews. Additionally, any fruit trees on your property can use a light sprinkling.
A ½ to 1 pound of wood ash per year is recommended for your shrubs or roses. Additionally, if your lawn is lacking lightly spread on the grass and gently rake in, applying no more than 10-15 pounds per 1,000 square feet.
But, always remember…Never leave lumps or piles of wood ash on or near your vegetation, as the concentration of salt from the ash is toxic to plants!
Plants to avoid:
Make sure you check the ph numbers of your plants if you are unsure whether or not to apply, but junipers, pines, firs or spruces, holly, azaleas, rhododendrons, blueberries, calla lilies, delphinium, crocus, camellias, phlox and ivy should be avoided.
It is also good to know to avoid your potato patches, in which wood ash will encourage the fungus that contributes to potato scab.

 
Pests, Composting and Ponds
Wood ash can be used also as a deterrent to surface feeding pests. Especially effecting slugs and snails as it draws water from their bodies, killing them.
If using wood ash in your compost pile, a light sprinkling after adding organic matter such as dried leaves, pine needles, or fruit waste will help the balance. Additionally, wood ash loses its benefits once it gets wet, so keep your supply covered or in a dry area.
Have some extra wood ash, even after adding it to your garden? If you are lucky enough to have a garden or fishing pond, go ahead and add one tablespoon to every 1,000 gallons of water. The potassium in the ash slows algae growth and aids the aquatic plant life.
Now, you if you are going to be hungrily looking at all that ash produced by the outdoor bonfires this Summer, go ahead and get sooty! But, you may want to avoid the ash that was left over after Uncle Ned threw his red Solo cups in the fire…
 
Cheers!